Help for Supplier Connection - SUPPLIER GUIDE
When creating an ASN, the turnaround function auto-populates shipment information on the input form with the requirement found on a shipping schedule. Using the turnaround function saves time and reduces errors.
Some Buying Organizations have additional requirements. Before submitting the ASN, check to see if the buyer company has additional requirements for you:
![]()
Complete the steps below to create an ASN from turnaround feature.
 Show me how to create
an ASN >>>
Show me how to create
an ASN >>>
Click view
on the main toolbar.
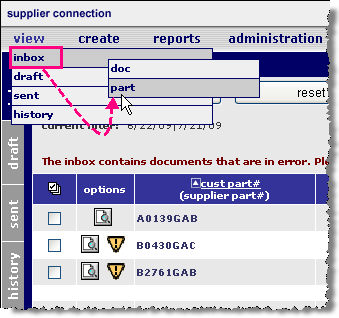
From the inbox
drop down menu, click part.
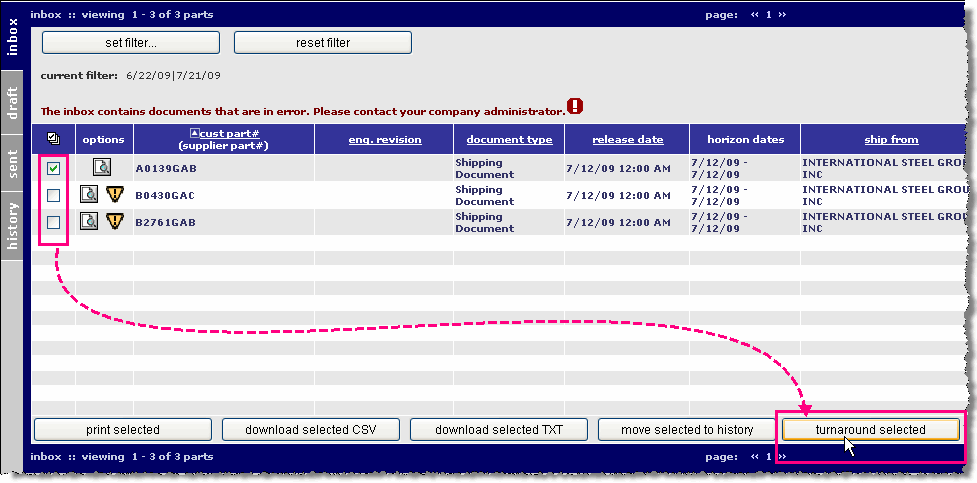
Enable the checkbox of
each part you wish to include on the ASN. (You
may use the set filter... option
to narrow results on this page. This
will allow you to filter parts for a particular ship-from / ship to combination,
and/or a from-date / to-date range. ).
Click turnaround
selected. The
screen refreshes, and the ASN screen is displayed with the parts selected.
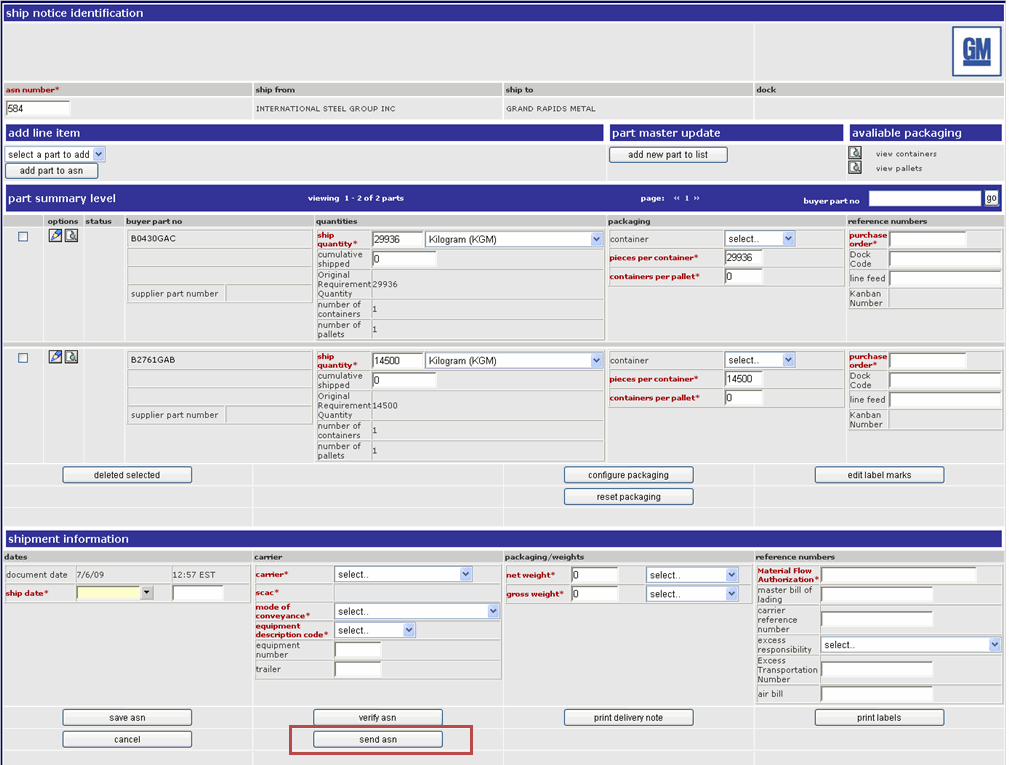
Some fields
on the ASN screen are pre-populated with data from the shipping document.
|
|
If the reference database had been updated with packaging information, those fields would also be updated. Otherwise, default data will be placed on the ASN. Refer to the section entitled Configure Packaging for details. |
Key in all required fields. (Required fields are identified with bold, red font and an asterisk). If you created a carrier profile, that information is auto-populated on this screen. You can modify that default information on this ASN if desired.
Key in data in the ship quantity in the open text field.
Key in the packaging
data including the pieces per container and containers per pallet open
text fields. If
those fields have not been updated into the reference database, those
fields can be left empty and default values will be used with the ASN.
Key in the trailer
code in the trailer open text field. This
is a required field!
Complete additional buyer
company requirements if any:
![]()
Click save
asn. Container
and pallet count values are calculated based on the packaging data entered.
If you
ship in standard packs, your ASN and bar code label will be correctly
generated. If
you use non-standard packaging, refer to the section entitled Configure
Packaging.
In the shipment information section of the screen, verify that the ASN time-zone is that of the ship-from location. If necessary, correct the time zone by updating the ship-from location record. Refer to the section entitled Viewing Ship-From Locations.
Modify the carrier from the drop down menu if necessary. (Carrier data is pre-populated from a default carrier assignment. Refer to Assigning a Default Carrier for details). If a record has not been created for the carrier, add the carrier. Refer to the section entitled Creating a Carrier Profile for details.
Optionally, enable the checkbox next to assign selected carrier as default field. When selected, this will be the default carrier record auto-populated on subsequent ASNs created for this ship-to destination.
Key in packaging weights and reference numbers.
Click verify
asn to scan for errors before sending.
|
IF... |
THEN: |
|
No errors are displayed |
Continue to step 14. |
|
Errors are displayed |
a. Resolve the errors. Refer to the section entitled Resolving Errors on ASN for details. b. Continue to step 14. |
Click print delivery note. The ASN report is generated. On the report is a detail line printed for each master pack created.
Click print labels. A label summary screen is displayed, showing the total number of containers and master packs for which labels will be produced. The total label count field indicates how many sheets of label stock is required.
Click the print icon to display the bar code labels in PDF format.
Review the labels.
|
|
Two identical labels are printed on each 8.5 x 11 sheet. Each container is to have two labels placed on it at adjacent corners. The sequence of labels is the container labels followed by a master pack label. |
Click send asn.
RESULT:
You have successfully sent an ASN using Turnaround. The ASN is stored in the SENT folder.

